相信很多开发者在项目实战中,经常会用到列表页面分页显示、加载更多等功能。Jetpack架构组件中Paging,就是将这部分的工作简化,使之搭配LiveData能够快速的完成页面初始化数据、分页数据的加载。
简介
什么是Paging?
Paging 组件是谷歌新推出的分页组件,可以轻松的帮助开发者实现RecyclerView中分页预加载以达到无限畅滑的效果。
Paging 工作原理
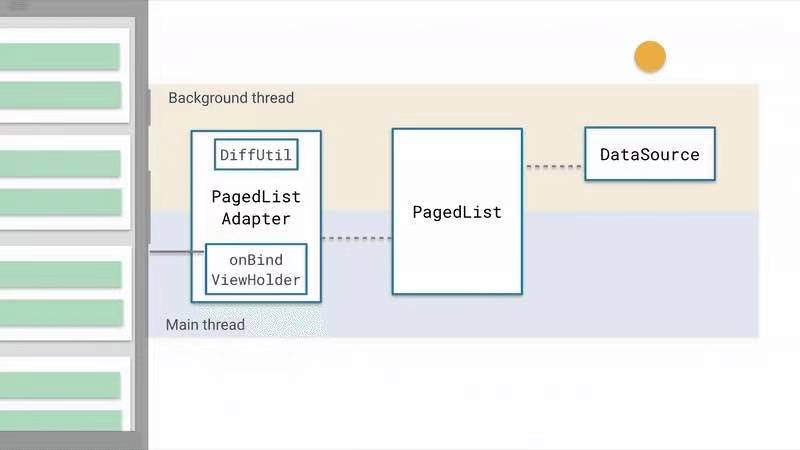
官方工作原理图示
![微信图片_20210118161937.jpg]()
1、DataSource 是数据源提供者,数据的改变会驱动列表的更新,因此数据源是跟重要的。这里一共有3种DataSource可选,取决于数据是以何种方式分页加载的。
- ItemKeyedDataSource: 基于cursor游标实现,数据容量可动态自增;
- PageKeyedDataSource: 基于页码实现,数据容量可动态自增;
- PositionalDataSource: 数据容量固定,基于index索引加载特定范围的数据。
2、PagedList 是核心类,它驱动Paging从数据源加载数据,同时负责 页面数据初始化和分页数据何时加载,以何种方式加载
3、PagedListAdapter 是列表适配器,通过DiffUtil差分异定向更新列表数据。
Paging的工作流程
当DataSource加载出页面数据 —> 把数据转交给 PagedList 准备刷新页面 —> PagedListAdapter 数据差分异 —> 定向刷新列表Item
Paging 使用
受限使用之前添加依赖项
implementation 'androidx.paging:paging-runtime:2.1.0'
|
Paging的设计和传统的分页加载不一样,它巧妙的结合了LiveData的功能。先看如何使用Paging触发页面初始化数据:
- 1) 构建PagedList.Config 对象,用以声明以何种方式分页
PagedList.Config config = new PagedList.Config.Builder()
.setPageSize(10)
.setInitialLoadSizeHint(20)
.setPrefetchDistance(10)
.setMaxSize(50)
.setEnablePlaceholders(true)
.build();
|
DataSource.Factory factory = new DataSource.Factory() {
        @NonNull
        @Override
        public DataSource create() {
            return new ItemKeyedDataSource() {
                @Override
                public void loadInitial(@NonNull LoadInitialParams params, @NonNull LoadInitialCallback callback) {

                }

                @Override
                public void loadAfter(@NonNull LoadParams params, @NonNull LoadCallback callback) {

                }

                @Override
                public void loadBefore(@NonNull LoadParams params, @NonNull LoadCallback callback) {

                }

                @NonNull
                @Override
                public Object getKey(@NonNull Object item) {
                    return null;
                }
            };
        }
    };
|
- 3)构建一个能触发页面加载初始化数据的LiveData对象
LiveData<PagedList<Object>> pageData = new LivePagedListBuilder<>(factory, config)
.setInitialLoadKey(0)
.build();
|
- 4)最后只需拿到前面构建出来的 LiveData 对象注册一个Observer观察者即可触发页面初始化加载
mViewModel.getPageData().observe(this, new Observer<PagedList<T>>() {
    @Override
    public void onChanged(PagedList<T> pagedList) {
        mAdapter.submitList(pagedList);
    }
});
|
那么Paging 是如何利用 LiveData 这个功能组件的,首先看下 ComputableLiveData 这个类,看源码它并不是 LiveData 的子类,但是它利用了 LiveData 的 onActive 方法被激活的时机。分析如下:
public abstract class ComputableLiveData<T> {
public ComputableLiveData(@NonNull Executor executor) {
mExecutor = executor;
mLiveData = new LiveData<T>() {
@Override
protected void onActive() {
mExecutor.execute(mRefreshRunnable);
}
};
}
@SuppressWarnings("WeakerAccess")
@NonNull
public LiveData<T> getLiveData() {
return mLiveData;
}
public void invalidate() {
ArchTaskExecutor.getInstance().executeOnMainThread(mInvalidationRunnable);
}
@SuppressWarnings({"WeakerAccess", "UnknownNullness"})
@WorkerThread
protected abstract T compute();
}
|
而这也就解释了为什么下面这段代码可以触发 Paging 的初始化数据的加载逻辑。
接下来再来看上面的 LivePagedListBuilder#build() 方法又是如何使用 ComputableLiveData 类的
public LiveData<PagedList<Value>> build() {
return create(mInitialLoadKey, mConfig, mBoundaryCallback, mDataSourceFactory,
ArchTaskExecutor.getMainThreadExecutor(), mFetchExecutor);
}
private static <Key, Value> LiveData<PagedList<Value>> create(
@Nullable final Key initialLoadKey,
@NonNull final PagedList.Config config,
@Nullable final PagedList.BoundaryCallback boundaryCallback,
@NonNull final DataSource.Factory<Key, Value> dataSourceFactory,
@NonNull final Executor notifyExecutor,
@NonNull final Executor fetchExecutor) {
return new ComputableLiveData<PagedList<Value>>(fetchExecutor) {
@Nullable
private PagedList<Value> mList;
@Nullable
private DataSource<Key, Value> mDataSource;
private final DataSource.InvalidatedCallback mCallback =
new DataSource.InvalidatedCallback() {
@Override
public void onInvalidated() {
invalidate();
}
};
@SuppressWarnings("unchecked")
@Override
protected PagedList<Value> compute() {
@Nullable Key initializeKey = initialLoadKey;
if (mList != null) {
initializeKey = (Key) mList.getLastKey();
}
do {
if (mDataSource != null) {
mDataSource.removeInvalidatedCallback(mCallback);
}
mDataSource = dataSourceFactory.create();
mDataSource.addInvalidatedCallback(mCallback);
mList = new PagedList.Builder<>(mDataSource, config)
.setNotifyExecutor(notifyExecutor)
.setFetchExecutor(fetchExecutor)
.setBoundaryCallback(boundaryCallback)
.setInitialKey(initializeKey)
.build();
} while (mList.isDetached());
return mList;
}
}.getLiveData();
}
|
接下来进入 PagedList 的 build 方法
public PagedList<Value> build() {
    ... ...

    return PagedList.create(
            mDataSource,
            mNotifyExecutor,
            mFetchExecutor,
            mBoundaryCallback,
            mConfig,
            mInitialKey);
}
|
进入 create 方法
static <K, T> PagedList<T> create(@NonNull DataSource<K, T> dataSource,
@NonNull Executor notifyExecutor,
@NonNull Executor fetchExecutor,
@Nullable BoundaryCallback<T> boundaryCallback,
@NonNull Config config,
@Nullable K key) {
if (dataSource.isContiguous() || !config.enablePlaceholders) {
int lastLoad = ContiguousPagedList.LAST_LOAD_UNSPECIFIED;
if (!dataSource.isContiguous()) {
dataSource = (DataSource<K, T>) ((PositionalDataSource<T>) dataSource)
.wrapAsContiguousWithoutPlaceholders();
if (key != null) {
lastLoad = (Integer) key;
}
}
ContiguousDataSource<K, T> contigDataSource = (ContiguousDataSource<K, T>) dataSource;
return new ContiguousPagedList<>(contigDataSource,
notifyExecutor,
fetchExecutor,
boundaryCallback,
config,
key,
lastLoad);
} else {
return new TiledPagedList<>((PositionalDataSource<T>) dataSource,
notifyExecutor,
fetchExecutor,
boundaryCallback,
config,
(key != null) ? (Integer) key : 0);
}
}
|
触发初始化数据的加载
ContiguousPagedList.java
ContiguousPagedList(
@NonNull ContiguousDataSource<K, V> dataSource,
@NonNull Executor mainThreadExecutor,
@NonNull Executor backgroundThreadExecutor,
@Nullable BoundaryCallback<V> boundaryCallback,
@NonNull Config config,
final @Nullable K key,
int lastLoad) {
super(new PagedStorage<V>(), mainThreadExecutor, backgroundThreadExecutor,
boundaryCallback, config);
mDataSource = dataSource;
mLastLoad = lastLoad;
if (mDataSource.isInvalid()) {
detach();
} else {
mDataSource.dispatchLoadInitial(key,
mConfig.initialLoadSizeHint,
mConfig.pageSize,
mConfig.enablePlaceholders,
mMainThreadExecutor,
mReceiver);
}
mShouldTrim = mDataSource.supportsPageDropping()
&& mConfig.maxSize != Config.MAX_SIZE_UNBOUNDED;
}
|
触发分页数据的加载
分页数据加载的逻辑是在 PagedListAdapter#getItem() 方法中触发的,接着又会调用 ContiguousPagedList#loadAroundInternal 方法。该方法会计算列表当前滑动状态下列表后面还需要追加几条 Item,列表前面还需要向前追加几条 Item,Paging 能向前向后分页加载数据,可谓是相当强大。
ContiguousPagedList.java
protected void loadAroundInternal(int index) {
int prependItems = getPrependItemsRequested(mConfig.prefetchDistance, index,
mStorage.getLeadingNullCount());
int appendItems = getAppendItemsRequested(mConfig.prefetchDistance, index,
mStorage.getLeadingNullCount() + mStorage.getStorageCount());
mPrependItemsRequested = Math.max(prependItems, mPrependItemsRequested);
if (mPrependItemsRequested > 0) {
schedulePrepend();
}
mAppendItemsRequested = Math.max(appendItems, mAppendItemsRequested);
if (mAppendItemsRequested > 0) {
scheduleAppend();
}
}
|
以上就是Paging分页加载数据的工作原理,但是还是要付诸实践,毕竟实践出真知。
列表数据差异增量更新
既然使用Paging分页组件,就得按照开发框架来应用。给列表RecyclerView设置Adapter需要使用 PagedListAdapter,并且要求传递一个 DiffUtil.ItemCallback 用以做列表新旧数据的差分异计算。这个思想很重要,很多开源框架用到,比如:Tinker的插件更新机制。有了这个差分异计算,便能使用Paging提供的列表数据差量更新能力了。
public class CategoryAdapter extends PagedListAdapter<Category, RecyclerView.ViewHolder> {

    protected CategoryAdapter() {
        super(new DiffUtil.ItemCallback<Category>() {
            @Override
            public boolean areItemsTheSame(@NonNull Category oldItem, @NonNull Category newItem) {
                return oldItem.getId() == newItem.getId();
            }

            @Override
            public boolean areContentsTheSame(@NonNull Category oldItem, @NonNull Category newItem) {
                return oldItem.equals(newItem);
            }
        });
    }

    @NonNull
    @Override
    public RecyclerView.ViewHolder onCreateViewHolder(@NonNull ViewGroup parent, int viewType) {
        return null;
    }

    @Override
    public void onBindViewHolder(@NonNull RecyclerView.ViewHolder holder, int position) {

    }
}
|
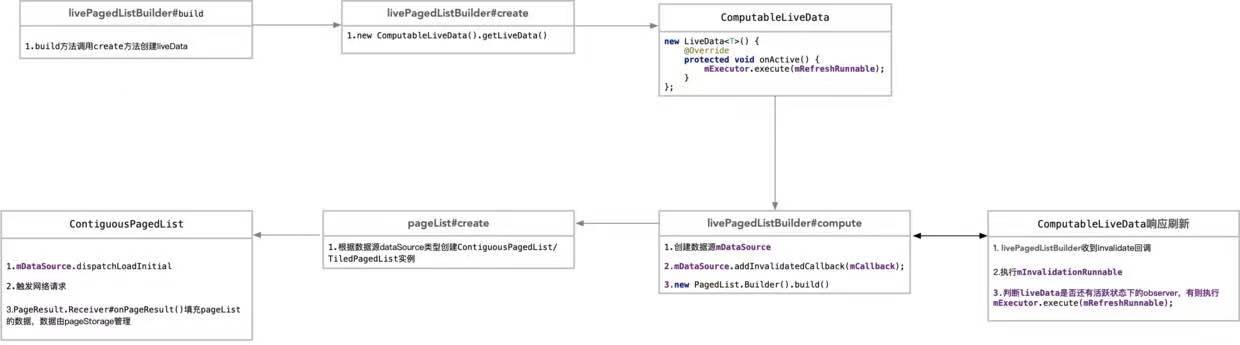
UML图解 Paging 工作流程
![微信图片_20210118203051.jpg]()
Paging 优缺点
虽然Paging的设计十分优秀,功能也很强大,但是现阶段版本仍然存在不足,有一些问题 Paging并没有给出合理的解决方案,比如:
- 1、PagedList 并不支持列表数据的增删改
- 2、Paging 一旦有一次分页失败,便再也不会继续分页,因为数据源已经失效;
- 3、Paging 如何先展示缓存数据再展示网络数据,也是个问题;
- 4、Paging 如果先添加了 HeaderView,再展示加载的网络数据,列表会自动往下滑动;